

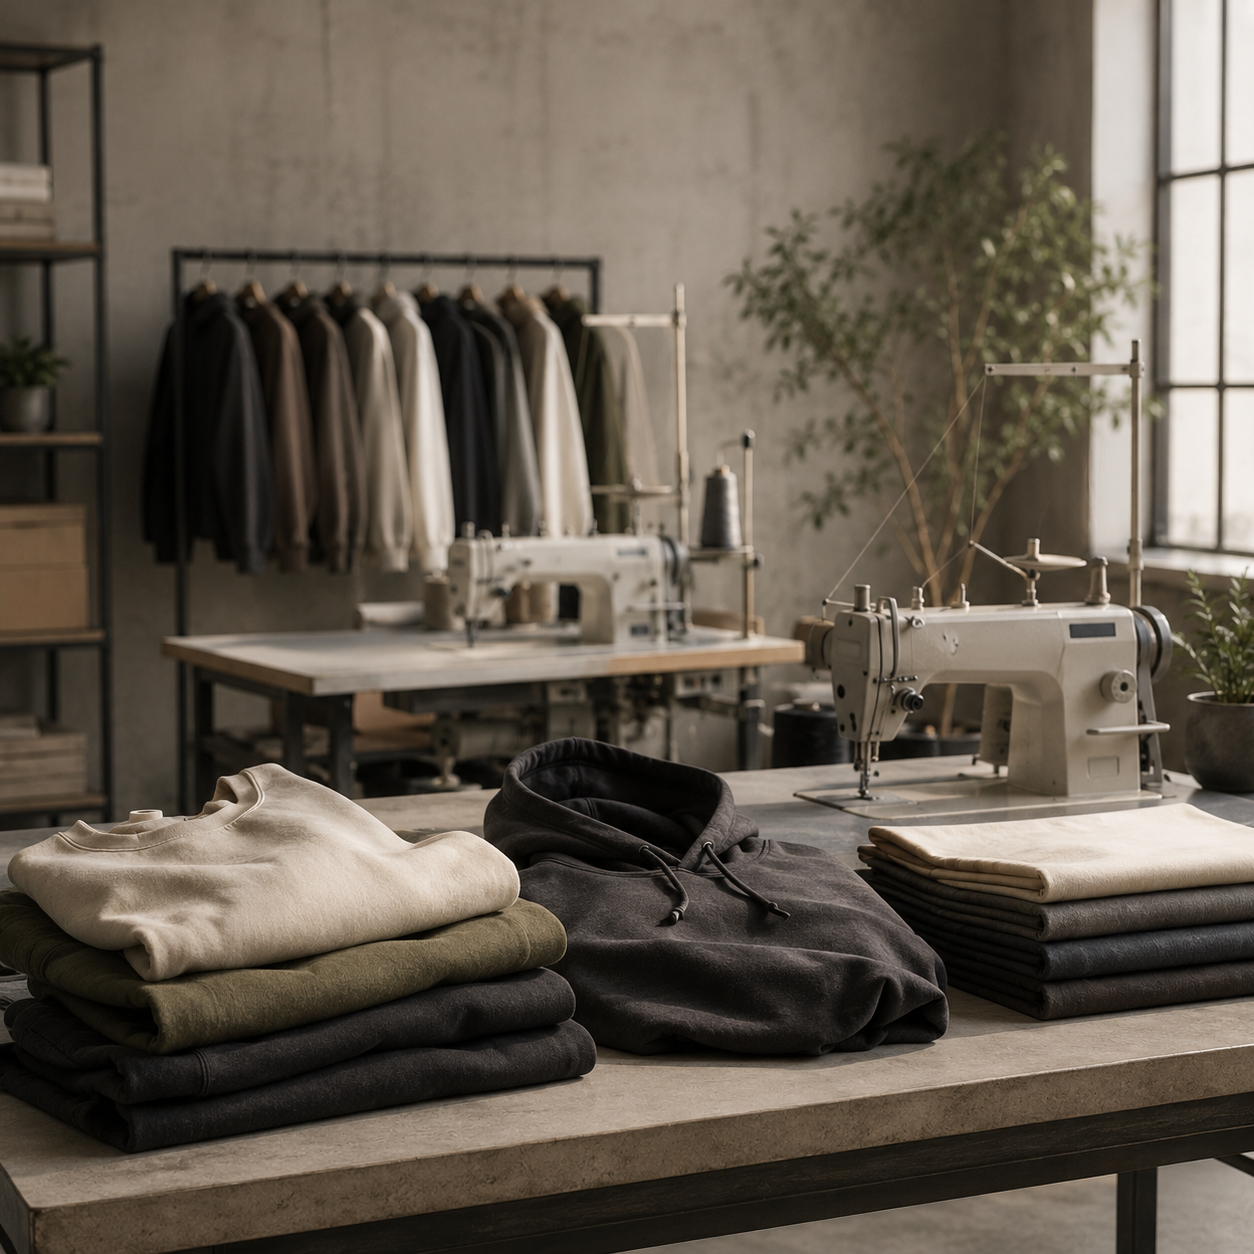
Your manufacturer cannot see the garment inside your head.
They cannot automatically know:
- How oversized the T-shirt should be
- Which cotton fabric you want
- Where the shoulder seam should sit
- How wide the collar should be
- Which stitching should be used
- How large the embroidery should be
- Where the labels belong
- How the product should be packaged
A mood board can communicate the atmosphere.
A reference photograph can communicate the general direction.
A tech pack communicates the product.
A clothing tech pack is the technical document that explains how a garment should look, fit and be manufactured. It normally combines technical drawings, materials, measurements, construction instructions, colours, artwork and branding information.
Tech packs are used by designers, pattern makers, product developers, manufacturers and quality-control teams as a shared product reference. Techpacker describes a tech pack as the blueprint that turns a product idea into manufacturing instructions.
The clearer the document, the easier it becomes for a manufacturer to:
- Understand the design
- Evaluate feasibility
- Source the correct materials
- Develop the pattern
- Produce an accurate sample
- Prepare a reliable quotation
- Control bulk production
- Identify whether the finished product matches the approved specification
This guide explains how to create a factory-ready clothing tech pack, page by page.
What Is a Clothing Tech Pack?
A tech pack—short for technical package—is a collection of product specifications sent to a clothing manufacturer.
It explains three fundamental things:
- What the garment looks like
- What the garment is made from
- How the garment should be constructed
A typical tech pack may contain:
- Style information
- Technical flat drawings
- Construction callouts
- Bill of Materials
- Fabric specifications
- Colour references
- Measurement chart
- Grading
- Tolerances
- Artwork files
- Print or embroidery positions
- Label specifications
- Packaging instructions
- Sample comments
- Revision history
The exact number of pages depends on the product.
A standard T-shirt may require a relatively simple document. A technical jacket with lining, zips, padding, internal pockets and custom hardware requires significantly more information.
What Is the Difference Between a Tech Pack and a Mood Board?
A mood board communicates inspiration.
It may include:
- Lifestyle photographs
- Colours
- Textures
- Styling
- Architecture
- Existing products
- Graphic references
- Brand atmosphere
A tech pack communicates manufacturing instructions.
It includes:
- Exact measurements
- Material composition
- Fabric weight
- Construction details
- Stitching
- Colour references
- Artwork dimensions
- Label positions
Mood boards are subjective.
Tech packs should be precise.
Both can be useful, but a mood board does not replace technical documentation.
Do You Always Need a Tech Pack?
Not every clothing order requires the same level of documentation.
You normally need a detailed tech pack when:
- Developing a custom garment
- Creating a new pattern
- Changing an existing fit
- Using custom fabrics
- Producing custom colours
- Adding original construction details
- Developing outerwear
- Producing denim
- Creating performance apparel
- Working with several materials or trims
- Requesting quotations from multiple manufacturers
- Scaling a product into several sizes
You may need less documentation when:
- Selecting an existing blank
- Using an established private label garment
- Adding only a simple print
- Adding standard embroidery
- Choosing from existing colours
- Using the supplier’s standard measurements
Private Label Clothes, for example, allows brands to choose an existing garment and submit artwork, garment sizes and label requirements through its product form. This simplifies development because the core garment has already been created.
Even in that situation, the brand should still provide accurate artwork dimensions, positions, colour references and size quantities.
What Should a Clothing Tech Pack Include?
A complete garment tech pack normally includes the following sections:
| Section | Purpose |
|---|---|
| Cover page | Identifies the style and document version |
| Technical drawings | Shows the garment from all necessary angles |
| Construction details | Explains seams, stitching and assembly |
| Bill of Materials | Lists every fabric, trim and component |
| Colourways | Defines each approved product colour |
| Measurement chart | Establishes garment dimensions |
| Grading | Shows how measurements change by size |
| Tolerances | Defines acceptable production variation |
| Artwork | Specifies prints, embroidery and placement |
| Labels | Defines branding and care-label requirements |
| Packaging | Explains folding, bags, boxes and carton packing |
| Sample comments | Records corrections and approvals |
| Revision history | Identifies the latest approved document |
Let us build each section properly.
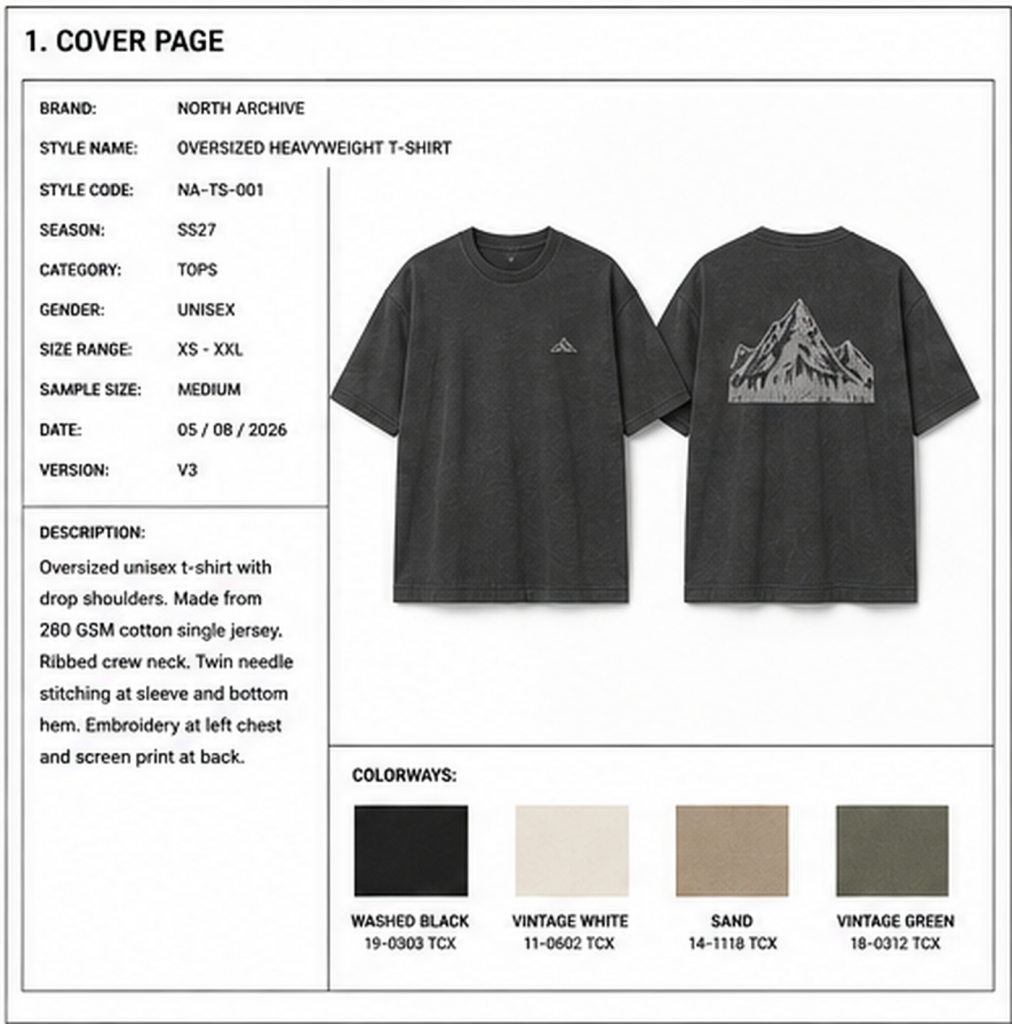
1. Create the Cover Page
The first page should make the product immediately identifiable.
Include:
- Brand name
- Product category
- Style name
- Style reference or SKU
- Season or collection
- Sample size
- Size range
- Designer or product developer
- Manufacturer
- Creation date
- Latest revision date
- Version number
- Product image or main technical drawing
Example
Brand: North Archive
Style: Oversized Heavyweight T-Shirt
Reference: NA-TS-001
Season: Spring/Summer 2027
Sample size: Medium
Size range: XS–XXL
Version: V3
Revision date: 6 August 2026
Every product should have a unique style reference.
Avoid using only names such as:
- Black hoodie
- New T-shirt
- Oversized style
- Sample number two
These descriptions become confusing when the collection expands.
2. Add Technical Flat Drawings
Technical drawings—also called fashion flats—show the garment as a flat, proportionate product rather than as an artistic fashion illustration.
They should normally be:
- Clear
- Clean
- Black and white
- Proportionate
- Drawn without dramatic poses
- Detailed enough to show construction
Techpacker recommends showing the garment from several necessary angles, including front, back, side, internal and close-up views where appropriate.
Include at least:
- Front view
- Back view
Add when necessary:
- Side view
- Inside view
- Hood detail
- Pocket detail
- Collar detail
- Cuff detail
- Waistband detail
- Zip construction
- Label positions
- Lining
- Reversible side
- Detachable parts
The drawing should show details such as:
- Seam placement
- Panels
- Pockets
- Darts
- Pleats
- Ribbing
- Topstitching
- Fastenings
- Drawcords
- Embroidery
- Print positions
- Hem shape
- Collar construction
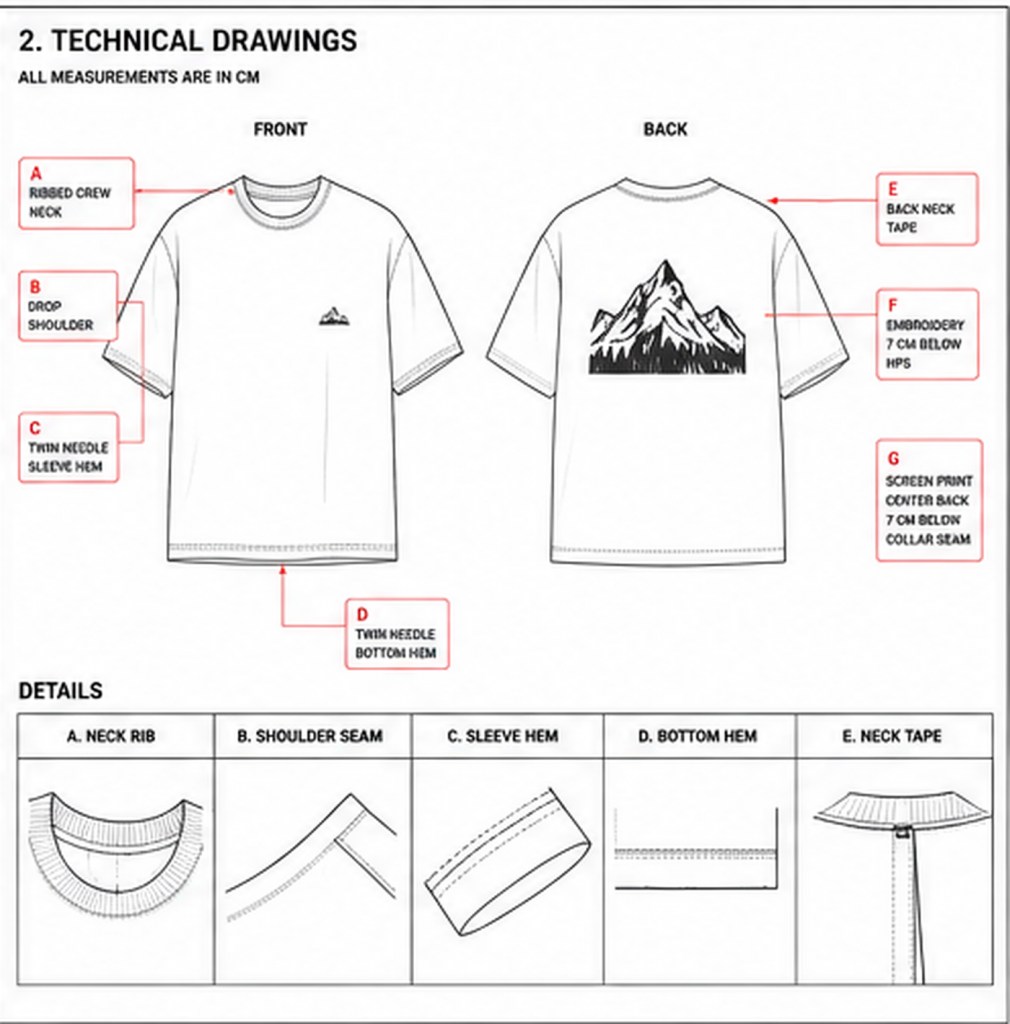
Technical Drawing Example: T-Shirt
A T-shirt flat may show:
Front
- Ribbed crew neck
- Drop shoulder
- Set-in sleeve
- Oversized body
- Straight hem
- Small chest embroidery
Back
- Centre-back main label
- Large printed artwork
- Twin-needle sleeve and bottom hems
Detail views
- Neck rib construction
- Shoulder seam
- Inside neck tape
- Embroidery placement
- Care-label position
Do not rely on arrows without written explanations.
Every callout should clearly identify what the arrow refers to.
3. Write a Product Description
Add a concise technical summary beneath the cover or technical drawings.
The description should explain the overall garment before the manufacturer reads the detailed pages.
Example
Oversized unisex short-sleeve T-shirt made from 100% cotton heavyweight single jersey. The style features dropped shoulders, a wide ribbed crew neck, internal shoulder-to-shoulder neck tape, a straight bottom hem and twin-needle stitching at the sleeves and hem. Small embroidery at the left chest and screen-printed artwork at the centre back.
This description establishes the product category and main features.
Avoid subjective instructions such as:
- Make it look premium
- It should feel expensive
- Make the shoulders cool
- We want luxury quality
- Make it similar to this brand
Translate those ambitions into measurable product decisions.
4. Build the Bill of Materials
The Bill of Materials, usually called the BOM, lists everything required to manufacture and deliver the product.
It is essentially the garment’s ingredient list.
A clothing BOM can include fabrics, thread, buttons, zips, elastic, labels, hardware and packaging.
A typical BOM should identify:
- Component
- Description
- Material
- Composition
- Weight or dimension
- Colour
- Supplier
- Supplier reference
- Placement
- Quantity per garment
- Approval status
- Notes
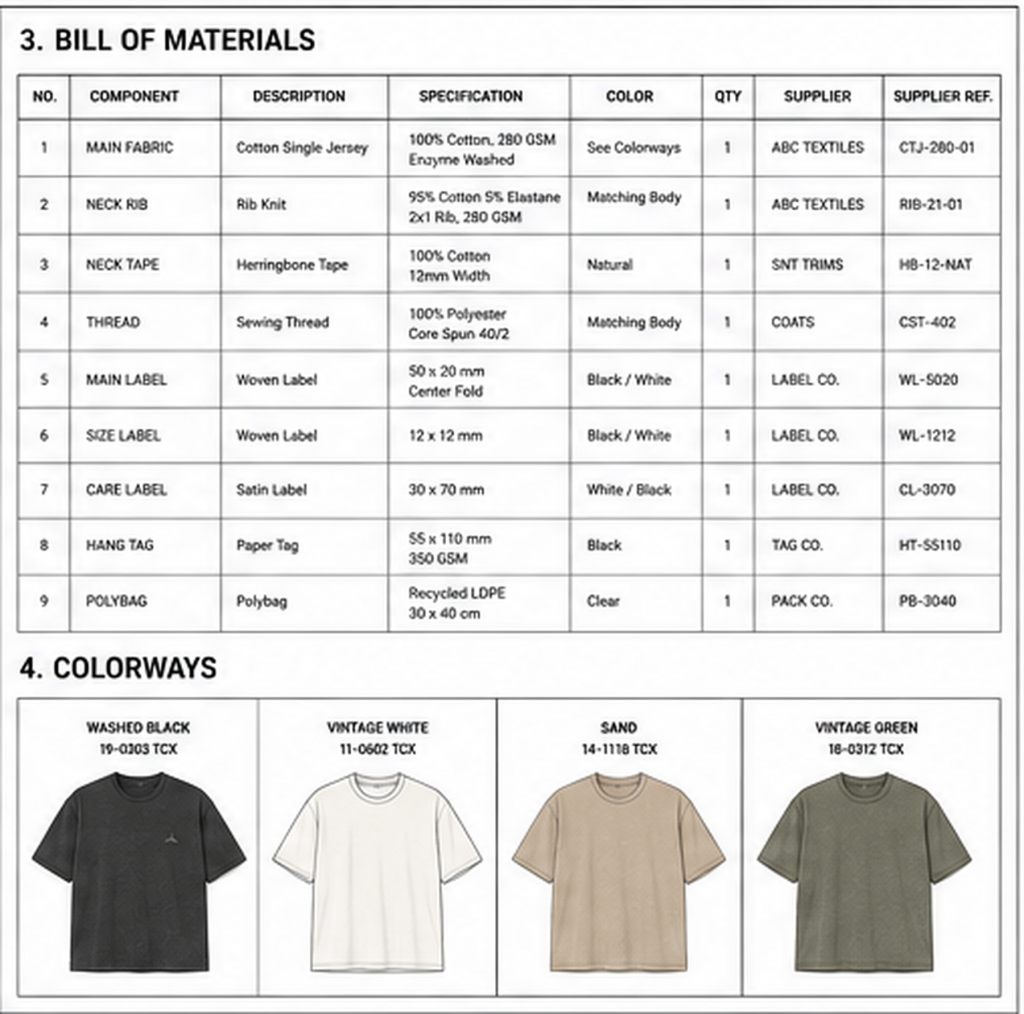
Example BOM
| Component | Specification | Colour | Placement |
|---|---|---|---|
| Main fabric | 100% cotton single jersey, 280 GSM | Pantone 19-0303 TCX | Full body |
| Neck rib | 97% cotton, 3% elastane, 2×1 rib | Matching body | Collar |
| Sewing thread | Polyester core-spun thread | Matching body | All seams |
| Main label | Woven damask, 50 × 20 mm | Black and white | Centre-back neck |
| Size label | Woven label, 12 × 12 mm | Black and white | Below main label |
| Care label | Satin printed label | Black on white | Inside left side seam |
| Hang tag | 350 GSM recycled card | Black | Attached at neck |
| Packaging bag | Recycled transparent polybag | Clear | One per garment |
5. Specify the Main Fabric
“Cotton” is not a complete fabric specification.
At minimum, include:
- Fibre composition
- Fabric construction
- GSM
- Colour
- Finish
- Stretch requirement
- Supplier or reference, when known
Example
100% combed cotton compact single jersey, 280 GSM, enzyme washed, pre-shrunk, low-pilling finish.
For blended fabrics, provide the complete composition:
80% organic cotton, 20% recycled polyester brushed fleece, 380 GSM.
For woven products:
98% cotton, 2% elastane woven twill, 280 GSM.
For performance products, you may also need to specify:
- Four-way stretch
- Moisture management
- Breathability
- Water resistance
- Abrasion resistance
- UV protection
- Recovery
- Pilling standard
Do not copy a technical claim from another garment unless you genuinely require and can test it.
6. Add Accurate Colour References
Descriptions such as “dark beige,” “warm cream” and “luxury green” are open to interpretation.
Use an established colour reference wherever possible.
For textile products, brands commonly use Pantone Fashion, Home + Interiors cotton references identified by the TCX suffix.
Example
- Black: Pantone 19-0303 TCX
- Off-white: Pantone 11-0602 TCX
- Sand: Pantone 14-1118 TCX
Digital colour displays are not reliable final production standards. Pantone itself warns that colours shown on a screen are simulations and should be visually evaluated using its physical colour publications.
For critical colours:
- Send a physical Pantone reference
- Request a lab dip
- Review the colour under controlled lighting
- Approve the physical sample before bulk production
Do not approve a fabric colour based only on an email attachment.
7. Define Every Colourway
A colourway page should show the complete product in each approved colour combination.
For every colourway, specify:
- Main fabric colour
- Rib colour
- Stitching colour
- Zip colour
- Button colour
- Print colour
- Embroidery colour
- Label colour
- Drawcord colour
- Hardware finish
Example
Colourway 1: Washed Black
- Body: Pantone 19-0303 TCX
- Rib: Matching body
- Thread: Matching body
- Chest embroidery: Off-white
- Back print: Off-white
- Main label: Black with off-white lettering
Colourway 2: Natural
- Body: Pantone 11-0602 TCX
- Rib: Matching body
- Thread: Matching body
- Chest embroidery: Black
- Back print: Black
- Main label: Natural with black lettering
Do not assume that “matching” always produces the same result across fabric, ribbing, thread and zips.
Different materials absorb dye differently.
8. Add Construction Instructions
Construction details explain how the product should be assembled.
Use technical callouts on the drawings and add close-up diagrams when necessary.
Specify:
- Seam type
- Stitch type
- Topstitching
- Seam allowance
- Stitch count
- Reinforcement
- Binding
- Facing
- Lining attachment
- Edge finishing
- Hem construction
- Bartacks
- Fastening application
Example Construction Notes for a T-Shirt
- Four-thread overlock at shoulder and side seams
- Shoulder-to-shoulder internal neck tape
- 2×1 rib collar
- Collar attached with overlock and single-needle topstitch
- Twin-needle cover stitch at sleeves and bottom hem
- Side seams
- Main label centred at inside back neck
- Care label inserted into left side seam
- Ends secured cleanly with no loose threads
Example Construction Notes for Sweatpants
- Elasticated waistband with internal drawcord
- Two side-entry pockets
- One back patch pocket
- Reinforced pocket openings
- Ribbed ankle cuffs
- Four-thread overlock internal seams
- Cover stitch around waistband
- Bartacks at pocket openings
- Eyelets positioned symmetrically
A technical drawing should show exactly where each instruction applies.
9. Create the Measurement Specification
The measurement chart—also called the spec sheet—defines the finished garment dimensions.
It tells the pattern maker and manufacturer how the approved product should measure.
A measurement table should normally include:
- Point of Measurement
- Measurement method
- Sample size
- Measurements for each size
- Positive tolerance
- Negative tolerance
Techpacker’s current measurement structure includes Points of Measurement, size specifications and acceptable tolerances.
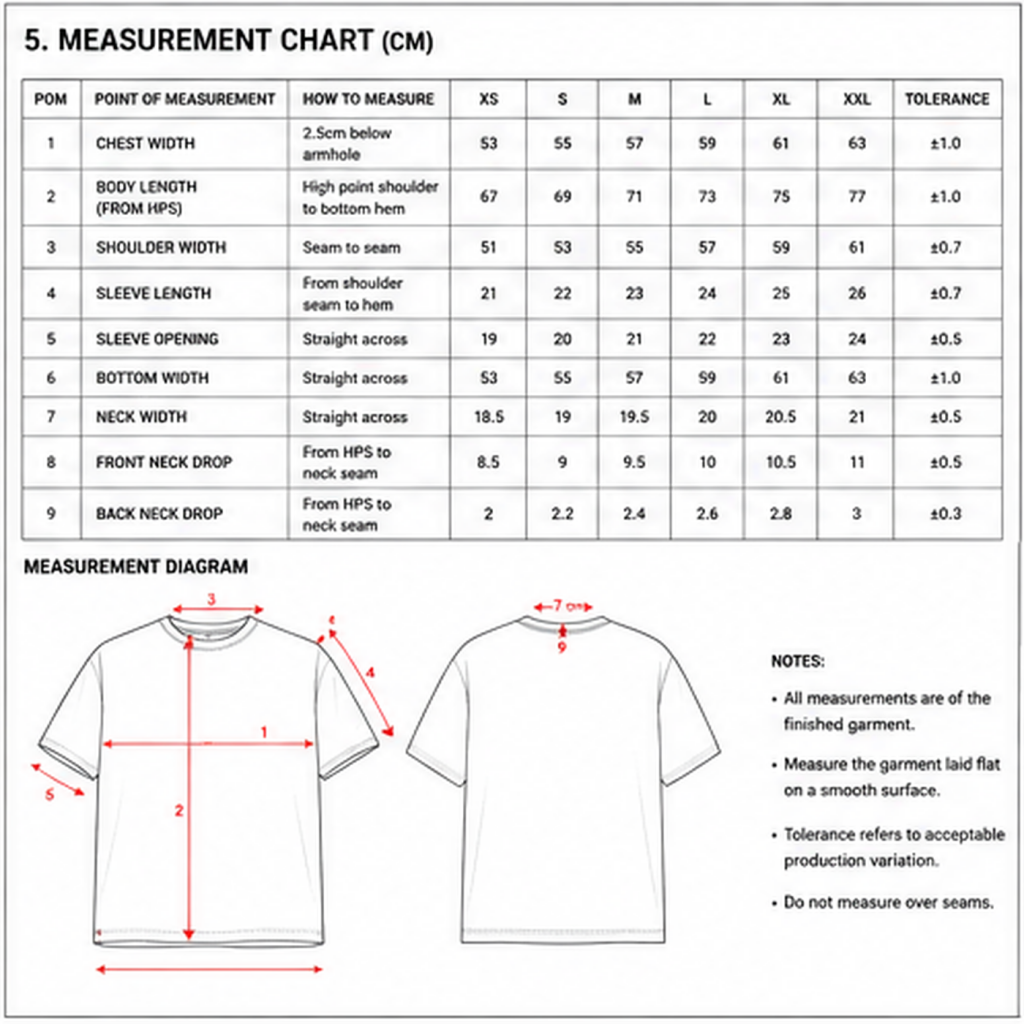
Example T-Shirt Measurement Chart
| Point of Measurement | XS | S | M | L | XL | Tolerance |
|---|---|---|---|---|---|---|
| Chest, 2.5 cm below armhole | 53 | 55 | 57 | 59 | 61 | ±1 cm |
| Body length from HPS | 67 | 69 | 71 | 73 | 75 | ±1 cm |
| Shoulder width | 51 | 53 | 55 | 57 | 59 | ±0.7 cm |
| Sleeve length | 21 | 22 | 23 | 24 | 25 | ±0.7 cm |
| Sleeve opening | 19 | 20 | 21 | 22 | 23 | ±0.5 cm |
| Bottom opening | 53 | 55 | 57 | 59 | 61 | ±1 cm |
| Neck width | 18 | 18.5 | 19 | 19.5 | 20 | ±0.5 cm |
| Front neck drop | 8 | 8.5 | 9 | 9.5 | 10 | ±0.5 cm |
All measurements above are illustrative only.
The correct measurements depend on your actual product and approved sample.
10. Explain How Every Measurement Is Taken
A measurement name alone can still be interpreted differently.
For example, “chest” could mean:
- Directly below the armhole
- 2.5 cm below the armhole
- Around the complete body
- Half circumference
- Measured flat
- Measured under tension
Create a Points of Measurement diagram using numbered arrows.
Example
POM 01 — Chest width: Measure straight across the garment, 2.5 cm below the underarm seam, with the garment laid flat and relaxed.
POM 02 — Body length: Measure from the High Point Shoulder beside the collar seam to the bottom edge.
POM 03 — Sleeve length: Measure from the shoulder seam to the finished sleeve edge.
The diagram and measurement table should use the same POM numbers.
11. Add Grading Rules
Grading determines how the garment changes from one size to another.
Do not simply add the same amount to every measurement.
Different parts of the garment may require different increments.
For example:
- Chest: +2 cm per size
- Body length: +2 cm per size
- Shoulder: +1.5 cm per size
- Sleeve length: +1 cm per size
- Neck width: +0.5 cm per size
The grade should preserve the intended silhouette across the complete size range.
An oversized medium should not become a narrow extra-small or an excessively long XXL merely because the measurements were scaled mechanically.
When possible, review a size set before bulk production.
12. Define Measurement Tolerances
Bulk production cannot always reproduce every measurement to the exact millimetre.
Tolerance defines the acceptable difference between the requested measurement and the finished garment.
Example
Requested chest width: 57 cm
Tolerance: ±1 cm
Acceptable result: 56–58 cm
Tolerances should be realistic and should not be identical for every measurement.
A small collar measurement may require a tighter tolerance than a large garment circumference.
Quality-control teams can compare finished measurements against the approved specification and identify dimensions falling outside the permitted range.
Do not use an excessively large tolerance to make an unstable product appear acceptable.
13. Specify Prints and Artwork
Create a separate page for each print.
Include:
- Artwork name
- Artwork reference
- Technique
- Final dimensions
- Placement
- Colours
- Pantone references
- Orientation
- File name
- Scale
- Approval status
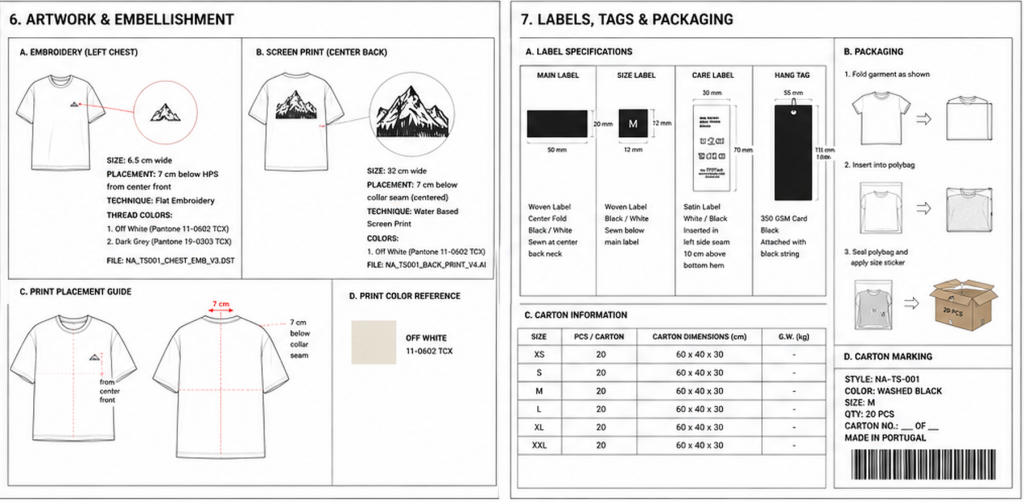
Example
Artwork: Rear Mountain Graphic
Reference: ART-002
Technique: Water-based screen print
Dimensions: 32 cm wide × 39 cm high
Placement: Centre back, 7 cm below collar seam
Colour: Pantone Black C
File: NA_ART002_BACK_PRINT_V4.ai
Submit Production-Ready Artwork
Preferred files often include:
- Adobe Illustrator
- EPS
- Vector PDF
- SVG
- High-resolution transparent PNG when appropriate
Do not send:
- Screenshots
- Compressed messaging-app images
- Photographs of a laptop screen
- Artwork copied from social media
- Low-resolution JPEGs
- Mock-ups without separate artwork files
The mock-up shows the visual intention.
The artwork file is what the manufacturer uses for production.
14. Define Embroidery Correctly
Embroidery requires different information from printing.
Include:
- Final width and height
- Exact placement
- Thread colours
- Pantone or thread references
- Stitch direction when important
- Maximum number of colours
- Backing requirements
- 2D, 3D or appliqué technique
- Approved embroidery sample
Very small text, thin lines and gradients may not reproduce accurately in embroidery.
The design may need to be simplified before digitization.
Example
Technique: Flat embroidery
Size: 65 mm wide
Position: Left chest, 90 mm below HPS and 85 mm from centre front
Colours: Two thread colours
File: NA_LOGO_CHEST_V2.ai
15. Add Branding and Label Specifications
Do not simply write “add our labels.”
Create a specification for every label.
Main label
Specify:
- Material
- Construction
- Width
- Height
- Fold type
- Background colour
- Text or logo colour
- Position
- Attachment method
Size label
Specify:
- Dimensions
- Material
- Size text
- Position
- Orientation
Care and composition label
Include:
- Fibre composition
- Care instructions
- Country of manufacture when required
- Company or responsible-party information
- Product reference
- Language requirements
- Certification information when applicable
Hang tag
Specify:
- Card material
- Dimensions
- Printing
- Hole position
- Cord
- Safety pin or attachment
- Placement
Example Label Page
Main label
- Woven damask
- 50 mm × 20 mm
- Centre-fold construction
- Black ground
- Off-white logo
- Sewn at inside centre-back neck
Size label
- Woven damask
- 12 mm × 12 mm
- Inserted below main label
- Black ground with off-white size text
Care label
- White satin
- 30 mm × 70 mm
- Black print
- Inserted into inside left side seam, 10 cm above bottom hem
Add the artwork for each label as a separate file.
16. Specify Trims and Accessories
Trims can include:
- Buttons
- Zips
- Snaps
- Drawcords
- Eyelets
- Elastic
- Buckles
- Rivets
- Metal plates
- Patches
- Velcro
- Cord ends
For every trim, provide:
- Material
- Colour
- Finish
- Dimensions
- Supplier reference
- Quantity
- Position
- Branding
- Reference image
Example
Zip: Two-way metal zip, size 5, antique silver finish, black cotton tape, branded rectangular puller.
“Silver zip” is not detailed enough.
17. Add Packaging Instructions
Packaging affects presentation, storage, shipping and product protection.
Specify:
- Folding method
- Garment bag
- Tissue paper
- Stickers
- Hang-tag placement
- Barcode
- Size sticker
- Box
- Carton quantities
- Carton dimensions
- Carton markings
Example
- Steam and inspect garment.
- Fold sleeves toward the back.
- Fold garment once horizontally.
- Insert into recycled transparent bag.
- Apply size sticker to bottom-right corner.
- Place 20 garments of one size per carton.
- Protect each colourway from transfer or contamination.
Include a folding diagram when presentation is important.
18. Add Quality Requirements
Define any mandatory quality criteria before production.
These may include:
- Shrinkage limits
- Colourfastness
- Pilling resistance
- Seam strength
- Print durability
- Embroidery appearance
- Measurement tolerance
- Needle detection
- Metal detection
- Restricted-substance compliance
- Fabric certification
- Wash testing
Do not write “high quality.”
Define what quality means for the specific product.
Example
- No visible oil marks
- No loose threads longer than 5 mm
- No skipped stitches
- Symmetrical embroidery
- Print centred within ±5 mm
- Main label centred within ±3 mm
- Measurements within approved tolerances
- No shade variation within the same garment
- Garment free from holes, stains and fabric defects
19. Include Reference Images Carefully
Reference photographs can be useful for:
- Fit
- Wash
- Texture
- Pocket shape
- Stitching
- Hardware
- Finishing
- General proportion
Add written callouts explaining exactly which feature should be referenced.
Bad instruction
Make it exactly like this hoodie.
Better instruction
Reference image used only for the hood volume and front overlap. Do not copy the pocket, drawcord, body fit or stitching.
Reference images should clarify your original product—not replace the design process or encourage copying another brand.
20. Record Sample Comments
The tech pack should evolve throughout sampling.
After receiving a sample, create a clear comments page.
For each correction, include:
- Comment number
- Photograph
- Current result
- Required correction
- Measurement difference
- Approval status
Example
Comment 01 — Body length
Current sample: 74 cm
Required measurement: 71 cm
Correction: Reduce body length by 3 cm, maintaining the existing bottom-hem depth.
Comment 02 — Collar
Current result: Collar appears loose and rippled.
Correction: Increase rib recovery and reduce finished neck opening according to the revised measurement chart.
Comment 03 — Back print
Current position: 4 cm below collar.
Approved position: 7 cm below collar.
Correction: Move print down by 3 cm.
Avoid comments such as:
- Looks wrong
- Make it nicer
- Fit is strange
- Print is too weird
- Please improve quality
Explain the observable problem and the required solution.
21. Control Tech Pack Versions
Every important revision should create a new version.
Example
- V1 — Initial quotation
- V2 — Updated fabric and measurements
- V3 — First-sample comments
- V4 — Approved pre-production specification
- V5 — Final bulk-production version
Version control prevents the factory from accidentally using an outdated measurement chart, artwork file or material specification.
Current tech-pack platforms allow brands to lock document versions and share the approved version with manufacturers.
Use consistent file names:
BRAND_STYLE_DOCUMENT_VERSION_DATE
Example
NA_TS001_TECHPACK_V5_2026-08-06.pdf
Never send multiple documents named:
- Final.pdf
- Final-new.pdf
- Final-final.pdf
- Final-corrected-last.pdf
Recommended Tech Pack File Structure
Organize the project folder clearly.
Main folder
NA_TS001_OVERSIZED_TSHIRT
Subfolders
01_TECH_PACK02_ARTWORK03_LABELS04_REFERENCE_IMAGES05_SAMPLE_COMMENTS06_APPROVALS
Example files
NA_TS001_TECHPACK_V5.pdfNA_TS001_FRONT_EMBROIDERY_V2.aiNA_TS001_BACK_PRINT_V4.aiNA_MAIN_LABEL_V3.aiNA_CARE_LABEL_EN_PT_V2.aiNA_TS001_SAMPLE_COMMENTS_V2.pdf
A manufacturer should be able to identify the correct file without opening ten attachments.
Can You Create a Tech Pack in Excel?
Yes.
A basic tech pack can be created with:
- Microsoft Excel
- Google Sheets
- Adobe Illustrator
- Adobe InDesign
- Canva for simple layouts
- Specialized fashion product-development software
Excel is particularly useful for:
- Measurements
- BOMs
- Size breakdowns
- Costing
- Grading
- Quantity tables
Illustrator is useful for:
- Technical drawings
- Artwork
- Label files
- Placement diagrams
Specialized tech-pack and PLM platforms can combine sketches, materials, measurements, costing, comments and version control in one environment.
The software matters less than the clarity and accuracy of the information.
Can You Create a Tech Pack Without Being a Designer?
Yes, but you still need technical information.
A founder can begin by preparing:
- Product references
- Desired measurements
- Fabric specifications
- Colours
- Artwork
- Labels
- Quantity
- Target market
- Product description
A technical designer can then convert those decisions into:
- Accurate flat drawings
- Measurement charts
- Construction instructions
- BOM tables
- Factory-ready files
Do not hire someone to “create a tech pack” when you have not yet decided what the product should be.
A technical designer can document and develop your idea.
They cannot make every commercial and creative decision for you without direction.
Example Tech Pack Structure for a T-Shirt
A complete T-shirt tech pack could include:
Page 1 — Cover
- Brand
- Style name
- Reference
- Collection
- Version
- Sample size
Page 2 — Technical drawings
- Front
- Back
- Side
- Collar detail
Page 3 — Product description
- Fit
- Fabric
- Main features
- Construction summary
Page 4 — Bill of Materials
- Main fabric
- Rib
- Thread
- Labels
- Packaging
Page 5 — Colourways
- Black
- White
- Sand
- Artwork colours
Page 6 — Construction
- Seams
- Stitching
- Neck tape
- Hems
Page 7 — Measurements
- XS–XXL
- POM descriptions
- Tolerances
Page 8 — Measurement diagram
- Numbered POM arrows
- Measuring instructions
Page 9 — Artwork
- Front embroidery
- Back print
- Dimensions
- Positions
Page 10 — Labels
- Main label
- Size label
- Care label
- Hang tag
Page 11 — Packaging
- Folding
- Bag
- Size sticker
- Carton packing
Page 12 — Sample comments
- Corrections
- Approvals
- Revision status
Information a Manufacturer Needs for an Accurate Quotation
A tech pack explains the product, but the manufacturer normally needs additional commercial information.
Provide:
1. Product documentation
- Tech pack
- Reference samples
- Artwork
- Label files
2. Quantities
State:
- Total units per style
- Units per colour
- Approximate size breakdown
3. Deadline
Explain:
- Required sample date
- Required production-delivery date
- Planned launch date
4. Target production price
When possible, state the maximum workable production price per design.
A manufacturer may otherwise propose materials and construction that are technically excellent but commercially incompatible with your retail model.
5. Delivery destination
Provide:
- Country
- City
- Postal code
- Required commercial terms when known
A quotation based on “approximately 100–1,000 units” will not be as useful as a quotation based on a realistic initial order.
Common Tech Pack Mistakes
1. Using Only Mood Boards
A mood board does not include the information needed to make a pattern or calculate material consumption.
2. Missing Back Views
The factory should not guess how the back of the garment is constructed.
3. No Fabric Weight
“Premium cotton” is not a technical specification.
4. No Measurement Chart
Without measurements, the factory must create the fit based on its own assumptions.
5. No Tolerances
Quality control cannot determine which measurement variations are acceptable.
6. Inconsistent Colours
Using different colour names and references across several pages creates avoidable errors.
7. Artwork Without Dimensions
A logo shown on a mock-up does not communicate its real production size.
8. Missing Label Positions
“Custom labels included” does not explain how or where they should be attached.
9. Contradictory Instructions
The drawing, BOM, measurement chart and written notes must describe the same product.
10. Sending Outdated Files
Always identify one approved production version.
11. Copying Another Product
A reference photograph is not a substitute for original product specifications.
12. Adding Unnecessary Information
A tech pack should be complete but easy to navigate.
Do not fill it with decorative pages that the factory must search through to find essential instructions.
Factory-Ready Tech Pack Checklist
Before sending the file, confirm that it includes:
Product information
- Brand name
- Style name
- Style reference
- Version
- Date
- Sample size
- Size range
Drawings
- Front
- Back
- Additional necessary views
- Construction callouts
- Detail diagrams
Materials
- Fabric composition
- Fabric construction
- GSM
- Colour references
- Ribbing
- Thread
- Trims
- Hardware
Measurements
- Points of Measurement
- Measurement method
- Sample-size measurements
- Full size range
- Grading
- Tolerances
Artwork
- Production-ready vector files
- Final dimensions
- Exact positions
- Technique
- Colour references
Branding
- Main label
- Size label
- Care label
- Hang tag
- Position and attachment
Packaging
- Folding
- Individual packaging
- Stickers
- Barcodes
- Carton packing
Commercial information
- Quantity per style
- Quantity per colour
- Deadline
- Delivery destination
- Target production price
File control
- Version number
- Latest revision date
- Consistent file names
- One approved production document
Frequently Asked Questions
How much does a clothing tech pack cost?
The cost depends on the garment’s complexity and the level of product development required.
A simple T-shirt tech pack will normally cost less than documentation for a technical jacket, tailored suit or performance garment.
Pattern development, artwork creation and sampling may be charged separately.
How many pages should a tech pack have?
There is no mandatory number.
A basic T-shirt may require approximately 8–12 clear pages. A complex product may require considerably more.
The objective is not to produce the longest document.
It is to include every instruction necessary to manufacture the product correctly.
Does a tech pack include the pattern?
Not necessarily.
A tech pack explains the product specification.
The pattern is the set of shapes used to cut and construct the garment.
Some brands provide both. In other cases, the manufacturer develops the pattern from the tech pack and approved measurements.
Does a tech pack include grading?
It should include measurements for the intended size range or clear grading rules.
A base-size measurement chart alone does not fully explain how every production size should fit.
Can a factory create the tech pack?
Some manufacturers offer product-development services and may create or complete technical documentation.
However, the brand must still communicate the desired fit, materials, colours, details, quantity, target price and deadline.
Can I send a physical sample instead?
A physical reference sample is extremely useful.
It can help communicate:
- Fit
- Construction
- Fabric
- Washing
- Finishing
The tech pack should explain which aspects of the sample should be copied, changed or ignored.
Do I need Pantone colours?
Pantone references are strongly recommended for custom textile colours, prints and embroidery.
A physical colour approval or lab dip may still be required because screen colours do not reliably represent the final textile result.
Should measurements be in centimetres or inches?
Either can work, provided one system is used consistently and clearly identified throughout the document.
For European manufacturing, centimetres are commonly used.
Do I need a tech pack for private label blanks?
A complete cut-and-sew tech pack may not be necessary when you are selecting an existing product.
You should still provide clear artwork files, dimensions, placement, colour references, labels, quantities and packaging instructions.
When is the tech pack final?
The document normally develops throughout sampling.
The final bulk-production version should include every approved correction and should be clearly identified as the current production specification.
Final Answer: What Makes a Good Tech Pack?
A good tech pack removes assumptions.
It clearly communicates:
- What the garment looks like
- What it is made from
- How it is constructed
- How it should measure
- How it should be branded
- How the finished product will be evaluated
The manufacturer should not have to guess the fabric weight, fit, artwork dimensions, label positions or acceptable measurements.
The more accurately you define the product, the more accurately a factory can assess feasibility, prepare a quotation and develop the first sample.
Start with a clear design.
Turn every visual decision into a technical instruction.
Keep the document organized.
Record every revision.
Then send the manufacturer one clearly approved version.
Private Label Clothes allows emerging brands to create customizable T-shirts, hoodies, sweatpants and shorts in Portugal using established products, custom artwork and branded labels.
For fully custom projects, prepare complete technical documentation together with realistic quantities, deadlines and commercial targets before requesting production analysis.
Choose the right level of product development and start building your collection professionally.
